 ドキュメント
2.11 三角形・五角形などの多角形の描画
実験の目的
- 三角形や五角形などの複雑な多角形を描画します。
機能要件
三角形・五角形などの多角形を描画します。
ハードウェアの準備
| No. | 名称 | 数量 | 備考 |
|---|---|---|---|
| 1 | RDK X5 | 1 | 組み込みメインボード(32GB メモリーカード付き)。上位機(PC 側)システムとして動作します。 |
| 2 | カードリーダー | 1 | システムイメージの書き込みに使用します。 |
| 3 | USB カメラ | 1 | 画像を取得します。 |
| 4 | 電源ケーブル | 1 | 電源供給用です。 |
| 5 | LAN ケーブル | 1 | ネットワーク接続用です。 |
回路接続
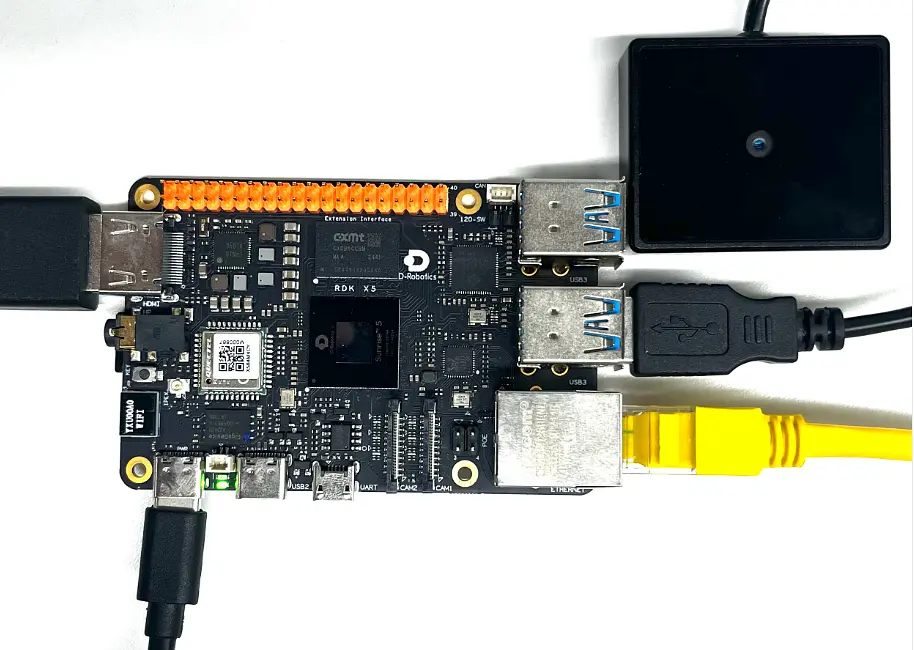
ソフトウェア設計
設計フローチャート

ソースコードのダウンロード
ソースコードファイル:11_opencv_draw_other_shape.rar
プログラムコード
完全なプロジェクトコードは(ソースコードファイル)をクリックしてダウンロードしてください。
"""
---------------------------------------------------------------
程序功能: 使用opencv打开USB摄像头,在实时显示的图像中画随机颜色, 随机位置的三角形,五角星,正六边形

---------------------------------------------------------------
"""

import cv2
import numpy as np
import math

# ==================== 初始化摄像头 ====================
# 打开默认摄像头 (使用udev规则)
# "/dev/mycamera" 是通过udev规则创建的符号链接,指向固定的物理摄像头
cap = cv2.VideoCapture("/dev/mycamera")

# 检查摄像头是否成功打开
if not cap.isOpened():
    print("错误:无法打开摄像头")
    exit()

print("按 'q' 键退出")

# ==================== 辅助函数定义 ====================
def get_regular_polygon(center, radius, num_vertices, angle_offset=0):
    """
    生成正多边形的顶点坐标

    参数:
        center: 正多边形的中心点坐标 (cx, cy)
        radius: 外接圆半径(中心到顶点的距离)
        num_vertices: 顶点数量(3=三角形, 4=正方形, 6=正六边形...)
        angle_offset: 角度偏移量(弧度),用于旋转图形

    返回:
        numpy数组: 形状为 (num_vertices, 1, 2) 的顶点坐标,适用于cv2.polylines
    """
    cx, cy = center  # 解包中心点坐标
    points = []      # 存储顶点列表

    # 循环计算每个顶点的坐标
    for i in range(num_vertices):
        # 计算当前顶点的角度(弧度)
        # 2π * i / num_vertices 将圆等分为 num_vertices 份
        # angle_offset 用于整体旋转
        angle = angle_offset + 2 * math.pi * i / num_vertices

        # 根据极坐标公式计算顶点坐标
        x = int(cx + radius * math.cos(angle))  # x = 中心x + 半径 * cos(角度)
        y = int(cy + radius * math.sin(angle))  # y = 中心y + 半径 * sin(角度)

        points.append([x, y])  # 添加顶点

    # 转换为 numpy 数组,数据类型为 int32(OpenCV要求)
    return np.array(points, np.int32)

def get_star_vertices(center, outer_radius, inner_radius, points=5):
    """
    生成五角星的顶点坐标

    五角星由10个顶点组成:外顶点(星尖)和内顶点(凹陷)交替出现

    参数:
        center: 五角星的中心点坐标 (cx, cy)
        outer_radius: 外顶点(星尖)到中心的距离
        inner_radius: 内顶点(凹陷)到中心的距离
        points: 星星的角数(默认5,产生五角星)

    返回:
        numpy数组: 形状为 (10, 1, 2) 的顶点坐标
    """
    cx, cy = center
    vertices = []

    # 生成 2*points 个顶点(外点和内点交替)
    for i in range(points * 2):
        # 计算角度:偏移 -π/2 让五角星的一个角朝上
        # i * π / points 将半圆(π弧度)等分为 points 份,乘2得到完整圆
        angle = i * math.pi / points - math.pi / 2

        # 根据奇偶性选择半径
        # i为偶数(0,2,4,6,8) → 外顶点(星尖),使用 outer_radius
        # i为奇数(1,3,5,7,9) → 内顶点(凹陷),使用 inner_radius
        r = outer_radius if i % 2 == 0 else inner_radius

        # 计算顶点坐标
        x = int(cx + r * math.cos(angle))
        y = int(cy + r * math.sin(angle))
        vertices.append([x, y])

    # 转换为 numpy 数组
    return np.array(vertices, np.int32)

# ==================== 主循环:实时采集并绘制 ====================
while True:
    # 从摄像头读取一帧图像
    ret, frame = cap.read()

    # 检查是否成功读取到图像
    if not ret:
        print("错误:无法获取帧")
        break

    # 获取图像的尺寸
    height, width = frame.shape[:2]

    # ==================== 1. 随机绘制一个三角形 ====================
    # 随机生成三角形中心点(距离边缘至少100像素,确保完全显示)
    tri_center = (
        np.random.randint(100, width - 100),   # x坐标
        np.random.randint(100, height - 100)   # y坐标
    )
    # 随机生成三角形半径(30~80像素)
    tri_radius = np.random.randint(30, 80)

    # 随机生成颜色 (B, G, R)
    tri_color = (
        np.random.randint(0, 256),  # 蓝色分量
        np.random.randint(0, 256),  # 绿色分量
        np.random.randint(0, 256)   # 红色分量
    )

    # 获取三角形的3个顶点坐标
    tri_pts = get_regular_polygon(tri_center, tri_radius, 3)

    # 绘制三角形(空心,线宽6像素)
    # polylines: 绘制多边形曲线
    #   frame: 目标图像
    #   [tri_pts]: 顶点列表(需用列表包装)
    #   isClosed=True: 封闭图形(首尾相连)
    #   color: 线条颜色
    #   thickness: 线宽
    cv2.polylines(frame, [tri_pts], isClosed=True, color=tri_color, thickness=6)

    # ==================== 2. 随机绘制一个五角星 ====================
    # 随机生成五角星中心点
    star_center = (
        np.random.randint(100, width - 100),
        np.random.randint(100, height - 100)
    )
    # 随机生成外半径(40~70像素)
    outer_r = np.random.randint(40, 70)
    # 内半径为外半径的一半(形成经典的星形凹陷)
    inner_r = outer_r // 2

    # 随机生成颜色
    star_color = (
        np.random.randint(0, 256),
        np.random.randint(0, 256),
        np.random.randint(0, 256)
    )

    # 获取五角星的10个顶点坐标
    star_pts = get_star_vertices(star_center, outer_r, inner_r)

    # 绘制五角星(空心,线宽7像素)
    cv2.polylines(frame, [star_pts], isClosed=True, color=star_color, thickness=7)

    # ==================== 3. 随机绘制一个正六边形 ====================
    # 随机生成正六边形中心点
    hex_center = (
        np.random.randint(100, width - 100),
        np.random.randint(100, height - 100)
    )
    # 随机生成六边形半径(30~80像素)
    hex_radius = np.random.randint(30, 80)

    # 随机生成颜色
    hex_color = (
        np.random.randint(0, 256),
        np.random.randint(0, 256),
        np.random.randint(0, 256)
    )

    # 获取正六边形的6个顶点坐标
    hex_pts = get_regular_polygon(hex_center, hex_radius, 6)

    # 绘制正六边形(空心,线宽8像素)
    cv2.polylines(frame, [hex_pts], isClosed=True, color=hex_color, thickness=8)

    # ==================== 显示结果 ====================
    cv2.imshow('Camera Feed', frame)

    # ==================== 键盘控制 ====================
    # 等待1毫秒,检测键盘输入
    # 如果按下 'q' 键,则退出循环
    if cv2.waitKey(1) & 0xFF == ord('q'):
        break

# ==================== 资源释放 ====================
cap.release()          # 释放摄像头设备
cv2.destroyAllWindows()  # 关闭所有OpenCV创建的窗口
操作手順
- ターミナルを開き、Python プログラムのディレクトリに移動してプログラムを実行します。以下のコマンドを入力してください。
python 11_opencv_draw_other_shape.py
実験結果
USB カメラを開き、リアルタイム映像に三角形、五芒星、正六角形の 3 種類の多角形を描画します。それぞれの位置・大きさ・色はランダムです。
参考結果:
お問い合わせ
資料のダウンロード・技術サポートについては、HumansX株式会社までお問い合わせください。